Manually setup a mapping of Excel columns to fields in a SQL Server table

Selecting the cells that should be exported
Mapping Excel Columns to Database Fields in SQL Server
Enabling Conflict Detection
Export Settings
Executing SQL code to manipulate the data that has been updated in SQL Server
Create a new Database Mapping
NOTE: You will have to also create a Database Import that will load the data from SQL Server into Excel, the Database Mapping only exports the data from Excel to SQL Server.
NOTE: For a quick start, use the SQL Spreads Designer to create a setup and then modify the Database Import and Database Mapping that was created by the Designer.- Click the Database Mapping button in the SQL Spreads tab in Excel.
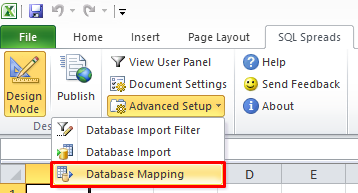
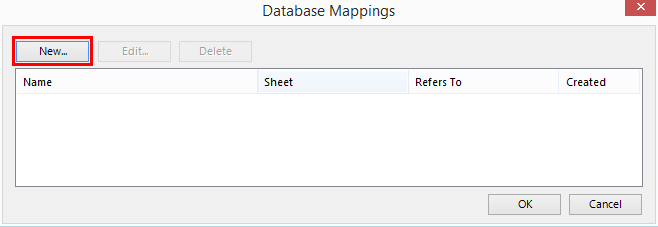
Note: To enable the Advanced Setup menu, go to Document Settings > Other Settings tab and check the Show Advanced Setup menu checkbox. - This will bring up the Database Mappings dialog where you can see your existing Database Mappings.
- Click New.
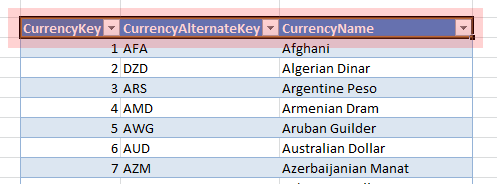
- Select the cells that should be exported to SQL Server. If all rows should be exported, just select the header row.

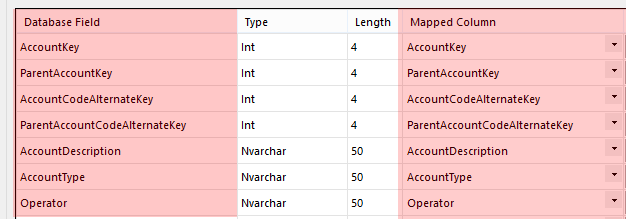
- Then in the drop-down lists, select the Database and Table where the data should be updated.

- SQL Spreads will try to automatically map the spreadsheet columns to the database fields. Check that the mapping is fine and click OK.
- In the Database Mappings dialog, click OK again.
- Click Refresh.
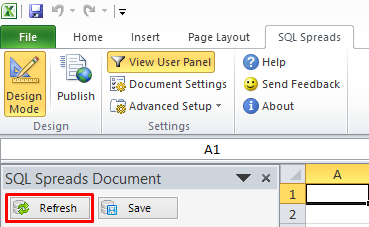
- Do a few changes to the data in the exported cells and click the Save button to write your changes back to SQL Server.
- Go to SQL Server Management Studio to validate that the data was updated in SQL Server.
NOTE: If your columns in Excel has the same header name as the fields in the database, SQL Spreads will automatically map the spreadsheet columns to the database fields.

NOTE: You can create several Database Mappings in the same Excel document.
Selecting which cells that should be exported
SQL Spreads can either export all rows below the header row, or a specified number of rows.
To export all rows
- Select the header row (or the first row of data if you do not have a header row. Then also uncheck the 'First row contains headers' checkbox)
- Check the Export all rows below selection that contains data checkbox at the bottom of the Database Mapping dialog:

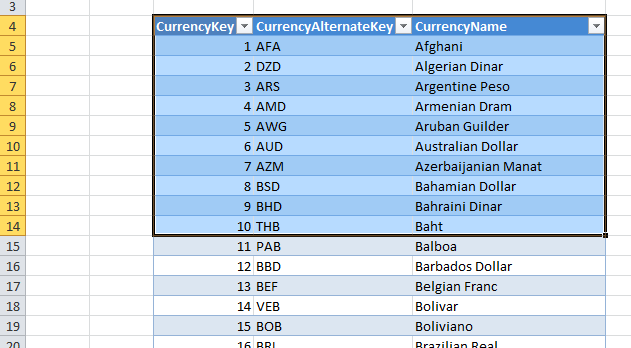
- Select the range of cells in Excel to export. In this example, three columns in row 5 to 14 will be exported.
- Uncheck the Export all rows below selection that contains data check box

Mapping Excel Columns to Database Fields in SQL Server
In SQL Spreads you can map exactly which columns in Excel that should be exported to specific fields in the database table. SQL Spreads also has a few built-in application columns that can insert application data into a field in the database table.
To map a column in Excel to a field in the SQL Server table, select the Excel column in the drop-down for the database field.
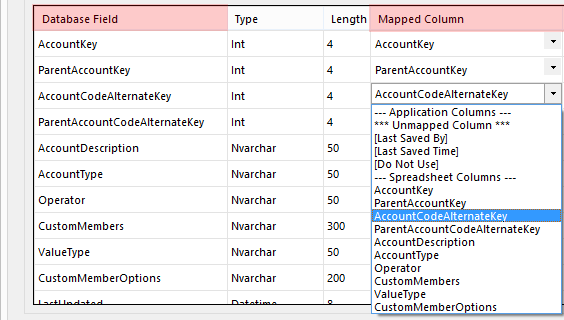
NOTE: If you use a Header row in Excel with the same column names as the fields in the database, SQL Spreads automatically map the Excel columns to the database fields.The Application columns are:
CreatedBy
Will keep the Windows Login name of the user who created the row.
CreatedOn
Will insert the current date and time when the row was created.
Will keep the Windows Login name of the user who lastly updated the row.
UpdatedOn
Will insert the current date and time when the row was updated.
Do Not Use
Will not insert any data into the database field
NOTE: If a database field is set to Do Not Use and you allow users to add new rows, you must set a default value for the field in the database.
Unmapped Columns
If SQL Spreads cannot automatically map the column, it will be set the ***Unmapped Colum***
Insert Data From Filter
If you have created an Import Data Filter, you can let SQL Spreads insert the selected filter value into a column in the database table.
To map a Database Column to a selected filter value, select the filter item in the DropDown List under the section --- Insert Value From Filter ---.
Use an Excel formula to update the value in a database column
There is a feature in SQL Spreads that allows you to use a formula in Excel to calculate the value that should be stored in a column in SQL Server.
The feature is called Formula Columns and will give you a blank column where you can add a formula that calculates a value based on other columns values.
Follow these steps to set up a column in SQL Spreads as a Formula Column:
- Create a setup using the SQL Spreads designer or manually.
- Go to the Advanced Setup menu, select Database Import and edit the Database Import for your setup.
For the column where you would like to add an Excel formula, set the column alias to FormulaColumn. Note that you must include the AS keyword when setting the alias: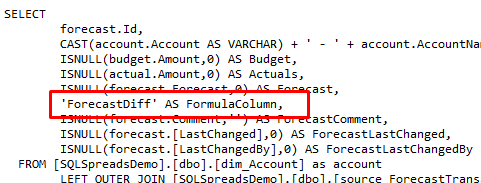
- Go to the Database Mapping and check the “Always update all columns” checkbox at the bottom. This will force SQL Spreads to always update all columns in a row. (When saving to the database, SQL Spreads by default only updates the columns in the database for which the user has changed a value in Excel)

- Add a formula to the column(s) in Excel.
- Click the Refresh button in SQL Spreads and check that the formula is preserved in the column and not overwritten by the value from the database.
- Change a value that will affect the formula, then save to the database and check that the result from the formula is saved to the database.
When setting a column alias to FormulaColumn, you must include the AS the keyword. You must also ensure that the cell format for the formula column is set to General.Formulas that depends on values outside of the database row
If you have formulas that depend on values in cells that are not in the same database row, you can force SQL Spreads to always update all rows by checking the "Update for all rows". In that way, you can have a formula with eg an index that should be applied to all rows.

Using several Formula Columns in a row
If you have several Formula Columns, set the alias to a FormulaColumn1, FormulaColumn2 etc.
Enabling Conflict Detection
SQL Spreads has a built-in Conflict Detection that will check if a row has been updated by another user since the last time the data was loaded into the spreadsheet.
If a conflicting row is detected, SQL Spreads will show a dialog with the actual conflicting rows in the database and in the spreadsheet. The user will have the option to Overwrite or keep the conflicting changes.
To enable conflict detection:
- You will need two columns in the database table; one column to keep the user who updated the row (eg of type nvarchar), and one column to keep the time when the last change was done (eg of type DateType2).
- Map the two columns to the application columns UpdatedOn and UpdatedBy

- Check the Enable Conflict Detection checkbox

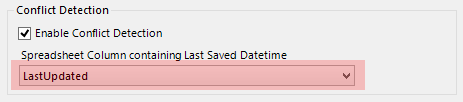
- In the drop-down list Spreadsheet Column containing Last Save Date Time, select the Excel Column that contains the date and time when the row was modified.
NOTE: To use conflict detection, you must have one column in your SQL Server table that stores the last time when the row was updated and one column to store which user that updated the row.Settings
First row contains headers
If checked, SQL Spreads will use the column names in the first row:

If unchecked, SQL Spreads will use the Excel column names, like Column - A, Column - B etc.

Export all rows below selection that contains data
If selected, SQL Spreads will grab all the rows with data below the selection and export them to the SQL Server table. See the section Selecting which cells that should be exported above for more details.
NOTE: If you would like to export all rows with data in a sheet, just select the header row, and then check the Export all rows below selection that contains data checkbox.
Allow Insert New Rows
If checked, the user will be allowed to insert new rows in the spreadsheet, and the rows will be inserted in the database table.
Allow Delete Rows
If checked, the user will be allowed to delete rows in the spreadsheet, and the rows will also be deleted in the database table.
Executing SQL code to manipulate the data that has been updated in SQL Server
If you need to manipulate the data that has been updated in SQL Server, you can create a Post-Save SQL Query in SQL Spreads that will be executed after the Excel data has been updated in the SQL Server tables.
To add a Post-Save SQL Query:
- In the SQL Spreads tab, click the Document Settings > Other Settings tab and click the Edit Post-Save SQL Query button.
- In the dialog, enter your query and click OK.

NOTE: The Post-Save SQL Query is executed in the same transaction as the update of the table data. This means that if your Post-Save SQL Query fails to execute, the update of the Excel data in your database tables will be rolled back and undone.